In the last chapter, we created our very own type, called Circle, using a feature in Kotlin called a class. In this chapter, we’re going to look at a special kind of class - an enum class - which is particularly useful when you want to represent a limited number of values.
Limiting the Values
My favorite kind of dog is the Schnauzer. In fact, I’ve got one lying down next to me right now as I’m writing this chapter! She’s a little grumpy about the click-clacking of my keyboard while she’s trying to nap, but I’ll make it up to her later when we play some fetch.
Anyway, let’s create a String variable to hold the name of a pet Schnauzer like this:
val nameOfSchnauzer: String = "Shadow"How many different names for Schnauzers can you think of? Shadow, Rover, and Captain Fluffybeard come to mind for me, but there’s really no limit to the variety of names that could be given to them. The possibilities are unlimited!
Schnauzer breeds, however, are a different story! There are only 3 breeds of Schnauzer:
- Miniature Schnauzer
- Standard Schnauzer
- Giant Schnauzer
So, while the number of names for a Schnauzer is unlimited, the number of breeds is limited to just 3 options.
How does all of this relate to programming?
When we’re writing code, we can reduce the likelihood of errors by choosing a type that limits the range of possible values to only those that are valid.
For example, a String can hold practically any text that you can imagine. Since you can name your dog almost anything imaginable, it would make sense to use a String to hold its name.
On the other hand, a String would not be a great choice to hold the specific breed of a Schnauzer. Why? Because strings can hold an infinite number of different values, but there are only 3 possibilities that could be correct for a Schnauzer breed. In other words, there’s no way to guarantee that you set a breed variable to one of those three correct values.
Let’s walk through an example to demonstrate this.
Let’s say we decided to use a String to represent the breed, like this:
val breedOfSchnauzer: String = "Mini"Now, somewhere else in our code, we might have a conditional that’s checking the breed like this:
if (breedOfSchnauzer == "Miniature") { // ... do something }We might have intended that the conditional expression would be
true, but since we incorrectly typed"Mini"instead of"Miniature", it evaluated tofalse… and we wouldn’t have known that anything was wrong until we ran the code.The problem is that we used a type that allows unlimited values (that is, the
Stringtype), when we needed a type that allows only a limited number of values. If we could create a type that only allows you to use one of the three breed names, we can make it so that the error above is not even possible!To create a type with limited values in Kotlin, you use an enumeration class… or as we more often refer to it, an enum class, or just an enum.
Creating an Enum Class
Let’s create an enum class to represent Schnauzer breeds.
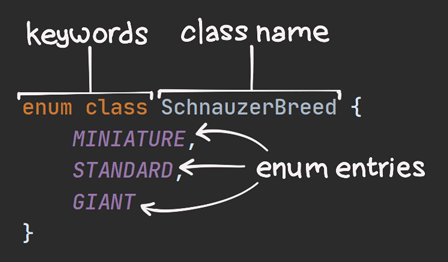
enum class SchnauzerBreed { MINIATURE, STANDARD, GIANT }This enum class is named
SchnauzerBreed, and it gives us three breed options to choose from.Here are the main parts of an
enum class:
- To create an enum class, we write
enum classrather than justclass.- After that comes the name that we want to give our class - in this case,
SchnauzerBreed.- Inside the body of the class, the options are called enum entries. Sometimes we call them enum constants instead. They’re separated with commas.
Using an Enum Class
Now that we have an enum class, we can start using it. Note that you will not construct an object from an enum class in the same way that you would do with normal classes, or you’ll get an error like this:
val breed: SchnauzerBreed = SchnauzerBreed()ErrorInstead, you just assign a variable to one of the options, like this:
val breed: SchnauzerBreed = SchnauzerBreed.GIANTBy using an enum class here, if we were to accidentally type
MINIinstead ofMINIATURE, then Kotlin would give us an error before we can even run the code!val breed: SchnauzerBreed = SchnauzerBreed.MINIErrorSo instead of using a
String, which can be set to just about anything, we limited the valid options to just three enum entries. By doing that, Kotlin can now help tell us when we typed something wrong, without having to even run the code!Using Enum Classes with
whenExpressions
Another nice benefit of using enum classes is that Kotlin provides some added assistance when we use them with a when conditional.
As you might recall, when expressions must account for every condition - that is, they must be exhaustive. Because enum classes limit the possible values, Kotlin can use this information to know when we have indeed accounted for every condition.
For example, here’s some code that returns a description of a breed.
fun describe(breed: SchnauzerBreed) = when (breed) { SchnauzerBreed.MINIATURE -> "Small" SchnauzerBreed.STANDARD -> "Medium" SchnauzerBreed.GIANT -> "Large" }Notice that there’s no
elsecondition here! Kotlin can tell that we’ve included all three of the enum entries in thewhenbody, so there are no other possibilities.If we were to omit some of the entries, Kotlin would give us an error:
fun describe(breed: SchnauzerBreed) = when (breed) { SchnauzerBreed.MINIATURE -> "Small" SchnauzerBreed.STANDARD -> "Medium" }ErrorTo remedy this error, we would either have to provide all of the enum constants, as we did in Listing 5.8, or we’d have to provide an
elsecondition, like this:fun describe(breed: SchnauzerBreed) = when (breed) { SchnauzerBreed.MINIATURE -> "Small" SchnauzerBreed.STANDARD -> "Medium" else -> "Unknown" }It’s great that Kotlin will give you an error when your
whenis not exhaustive. For example, whenever you add a new entry to an existing enum class, Kotlin will give you errors in all of thewhenexpressions that need to be updated - so you’ll know exactly what code needs to be changed!Adding Properties and Functions to Enum Classes

As you recall from the last chapter, normal Kotlin classes allow us to put properties and functions together. Is it possible to add properties and functions to an enum class?
Yes, it is!
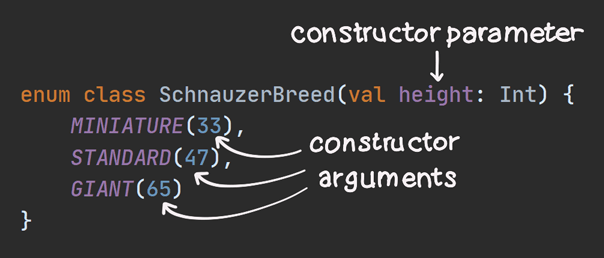
Let’s start by adding a property as a constructor parameter. We can do this just as we did with normal classes - by putting them between the opening
(and closing)parentheses after the name of the class.For example, we might want to include the approximate height of each breed, in centimeters. We can do that like this:
enum class SchnauzerBreed(val height: Int) { MINIATURE(33), STANDARD(47), GIANT(65) }Because we added a new constructor parameter called
height, we also had to add a constructor argument to each of the enum entries. So a miniature has an approximate height of33cm, a standard is about47cm, and a giant is about65cm tall.
Note that the enum entries are instances of the enum class.
You can get a property off of an enum instance just like you would do with regular objects. For example, we can print the height of a breed to the screen a like this:
println(SchnauzerBreed.MINIATURE.height)We can also include a property that does not require a constructor argument. Let’s add a property that tells us the
familyof breeds that they all belong to.enum class SchnauzerBreed(val height: Int) { MINIATURE(33), STANDARD(47), GIANT(65); val family: String = "Schnauzer" }The new
familyproperty is added to the end of the class body. It’s important to note that the semicolon;is required after the last enum entry! There aren’t very many times in Kotlin when you have to use a semicolon, but this is one of them.It’s just as easy to add a function. As above, make sure you include the semicolon, and then write the function beneath the enum entries.
enum class SchnauzerBreed(val height: Int) { MINIATURE(33), STANDARD(47), GIANT(65); val family: String = "Schnauzer" fun isShorterThan(centimeters: Int) = height < centimeters }You can get properties and call functions just as you would with any other class.
println(SchnauzerBreed.STANDARD.family) // Prints "Schnauzer" println(SchnauzerBreed.STANDARD.isShorterThan(40)) // Prints "false"Built-In Properties

In addition to any properties that you include yourself, Kotlin also automatically adds a couple of properties to all enum instances.
ordinalAll enum instances have a property called
ordinal. You can use this to tell where this enum entry appears in the list. The first entry in the list has an ordinal of0, the second has an ordinal of1, the third has an ordinal of2, and so on.For example, since
STANDARDis the second entry in the list, it has anordinalof1.
Yes, it starts with zero, which can be a bit confusing if you haven’t done much programming before. Once we get to the topic of collections, we’ll see how zero-based numbering is used a lot in programming!
nameIf you need to know the name of the enum entry as a string, you can use the
nameproperty.To demonstrate this, we can create a function that tells us the name of the breed, along with the height.
fun describe(breed: SchnauzerBreed) { println(breed.name) println(breed.height) }Now, we can call
describe(SchnauzerBreed.STANDARD), and we’ll see this on the screen:STANDARD 47Summary
In this chapter, we learned:
- How limiting the range of values can help make sure our programs are written correctly
- How to create an enum class
- How to use enum classes with the “when” conditional
- How to add properties and functions to an enum class
- How to use some built-in properties of enum classes
Congratulations! You’ve come a long way since chapter one! Stay tuned for nulls and null-safety in the next chapter!
Thanks to James Lorenzen and Mohit for reviewing this chapter!

