Way back in chapter 1, we learned about a variety of types in Kotlin, such as Double, String, and Boolean. In this chapter, we’re going to start creating our very own types.
Putting Variables and Functions Together
As you might recall, we started off this book creating variables to hold things pertaining to a circle, such as its radius and circumference. And in chapter 2, we created a function to calculate the circumference from the radius.
It all looked kind of scrambled, like this:

This was manageable for such a simple example, but as we come up with more and more things that we want to know about the circle, such as its diameter, area, or position, it can become quite difficult to manage all of those different variables and functions. And once we start introducing other shapes, like rectangles and triangles, it becomes even harder to keep things straight - for example, which functions give us the area of a circle, and which give us the area of a rectangle?
So in this chapter, we’ll create a new type called a Circle. This way, instead of having separate variables and functions that hold a radius and a circumference, we can have a single variable that represents the circle itself.
So instead of the scrambled variables and functions above, it’ll look more like this:

In Kotlin, we can put related variables and functions together using a class, which is a feature that we will use to create our new Circle type.
Defining a Class
Let’s create our very first class, a Circle, which will include these variables and functions:
- The
radiusvariable - The read-only
pivariable - The
circumference()function
Instead of jumping into all of this at once, let’s build up this class slowly… one step at a time… and look carefully at each part.
An Empty Class
First, let’s define an empty class - with no variables and no functions.
class CircleThis is all it takes to create a new class called
Circle!When we create a class, we’re creating a new type, just like
Int,Double, andString. In other words, once we define theCircleclass like this, we can use it anywhere that we’d normally put a type, such as a function parameter.fun draw(circle: Circle) { // Code that draws the circle would go here }Our First Diagram
It’s often useful to diagram your classes, so that you can visualize them and communicate your ideas to your friends. We’ll also use diagrams throughout the rest of this book to help explain concepts.
So, as we’re building out this
Circleclass, we’ll also diagram it at each stage, using a diagramming standard called the Unified Modeling Language, or UML for short.We’ll start simple. To show a class, just put the name of the class in a box, like this. (I’ll also add the Kotlin code alongside the diagram, so that you can compare them).

class CircleNow that we’ve got our new
Circletype, we could create a variable to hold it, but since our class is completely empty, it’s not particularly useful yet. So, before we do that, let’s give ourCirclearadius!Adding a
radiusPropertyIn real life, every circle has a radius, so we need to make sure that every
Circlein our code also has aradiusvariable. Here’s how we can do that:class Circle(var radius: Double)Here, we added a new variable to the class, called
radius, which has a type ofDouble. The value ofradiuscan be changed, because of thevarthat comes before it. In Kotlin, a variable in a class like this is called a property of the class.Let’s also update our diagram to show that a
Circleclass has aradiusproperty. To do this, we draw a horizontal line under the name of the class, and write out the name of the property and its type, almost identically to how we write it in our Kotlin code:

class Circle(var radius: Double)Now that we’ve got a circle class with a radius, we’re ready to start using it!
Objects
In this book, we’ve already created lots of variables. For example, here’s how we can declare and assign a variable with a
Doubletype:val radiusOfSmallCircle: Double = 5.2As mentioned, when we created the class, we made a new type called
Circle. Just like you can have a variable that’s aDoubletype, you can also have a variable that’s aCircletype. Declaring and assigning aCirclevariable is easy:val smallCircle = Circle(5.2)This creates a new variable called
smallCircle, which is assigned aCirclewith a radius of5.2.Keep in mind - just as you can have many different
Doublevalues like…
5.26.710.0… you can also have lots of different
Circlevalues like…
- A circle with a radius of
5.2- A circle with a radius of
6.7- A circle with a radius of
10.0But when it comes to classes, instead of calling these values, we usually call them objects.
Constructing Objects
Let’s look at that code again.
// Declaring the class class Circle(var radius: Double) // Using the class val smallCircle = Circle(5.2)What’s happening when we write
Circle(5.2)?It’s kind of like we’re calling a function named
Circle()that has a parameter calledradiusand a return type ofCircle. These kinds of functions aren’t called functions, though. They’re called constructors because they construct a new object.Constructor Parameters
Note that when you call a constructor, you must provide an argument for every property that is listed between the constructor’s opening and closing parentheses -
(and). Since we putvar radius: Doublebetween those parentheses, we have to provide an argument of typeDoublewhen we call the constructor: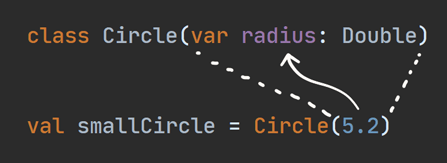
Note that
radiusis actually filling two roles:
- It’s a constructor parameter. You have to provide a value for it whenever you call the constructor. (However, just like with function parameters, you can also give a constructor parameter a default argument).
- It’s a property. You’ll be able to get the value of the
radiusfrom any circle object. We’ll see an example of this in a moment.A constructor parameter like
radius, which is preceded byvalorvar, is sometimes also called a property parameter, because it acts as both a property and a constructor parameter.When you create an object, we say that you’re creating an instance of the class. For that reason, creating an object is sometimes referred to as instantiating the class.
Classes vs. Objects
The difference between classes and objects can be confusing at first, so let’s take a moment to clarify it.
A class describes the characteristics and behavior of some concept. If we’re talking about circles, those characteristics might include its radius, diameter, circumference, and area.
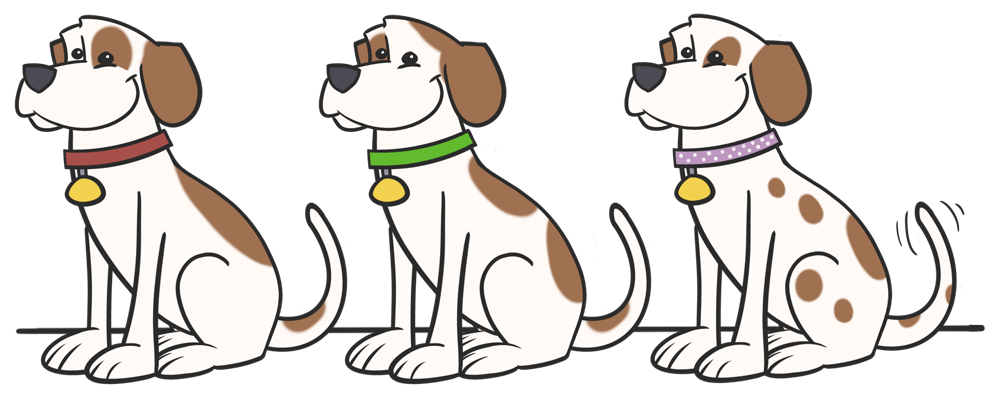
An object is an actual particular instance of that thing. Here are three circle _objects~:

A circle class answers questions like:
- “What does it mean for something to be a circle?”
- “What characteristics does it have?”
- “What does it do?”
A circle object answers questions like:
- “What is the radius of this particular circle?”
- “What is its circumference?”
- “What is its area?”
Here are a few more examples to help distinguish between classes and objects.
- You might have a Number class, with objects like 32,768 or 6.62607015.
- You might have a Color class, with objects like red, green, and blue.
- You might have a Dog class, with objects like Fido, Rover, or Mrs. Wagglytails.

We’ll see plenty more examples of classes and objects throughout the rest of this book!
Getting a Property’s Value
Now that we’ve created a circle object, how can we get its radius?
Easy: to get the value of a property on an object, type the name of the variable, a dot
., and the name of the property, like this:val smallCircle = Circle(5.2) val radiusOfSmallCircle: Double = smallCircle.radiusAfter running that code,
radiusOfSmallCirclewill be equal to5.2.That takes care of
radius. It’s time to move onto the other property,pi.Constant Properties
We could put
piinside the parentheses like we did forradius, separating them with a comma:class Circle(var radius: Double, val pi: Double)But if we do this, then we’d have to provide
pievery time we instantiate a circle, like this:val smallCircle = Circle(5.2, 3.14) val mediumCircle = Circle(6.7, 3.14) val largeCircle = Circle(10.0, 3.14)Hmm… that’s not quite what we want. Since
pishould always be the exact same value regardless of the particular circle, it doesn’t make sense for it to be a constructor parameter.In fact, it would be better if the calling code could never specify the value of
piwhen constructing aCircle.To do that, we can simply move
piout of the parentheses, so that it looks like this:class Circle(var radius: Double) { val pi: Double = 3.14 }Here, we added an opening brace
{and a closing brace}. Everything between those braces is called the body of the class. Inside of the body, we declarepi, and assign it a value of3.14.By moving it out of the parentheses, the
piproperty is no longer a constructor parameter, so we can continue to call the constructor with just the radius, as we did back in Listing 4.5:val smallCircle = Circle(5.2)Private Properties
As it is now, you can take any circle and get the value of both
radiusandpi:val smallCircle = Circle(5.2) val radiusOfSmallCircle = smallCircle.radius val piFromSmallCircle = smallCircle.piI can’t think of too many reasons why code outside of the class would need the value of
pi. Let’s make it so that this property is only visible from inside the class. To do that, we can add the keywordprivatewhen we declare it.class Circle(var radius: Double) { private val pi: Double = 3.14 }Now, if you try to get the value of the
piproperty from outside of the class body, you’ll get an error:val smallCircle = Circle(5.2) val radiusOfSmallCircle = smallCircle.radius val piFromSmallCircle = smallCircle.piErrorLet’s update our UML class diagram to include the
piproperty. We can indicate the visibility of a property in the diagram:
- Private properties are preceded with a
-symbol- Public properties are preceded with a
+symbol

class Circle(var radius: Double) { private val pi: Double = 3.14 }Now, we’re ready to add the
circumference()function to the class!Adding a Member Function
When a function belongs to a class, it’s often called a method or member function. Adding a method to a class is easy - just put it into the body of the class. To start with, let’s just take the exact same function from Listing 2.3, and plop it verbatim into our
Circleclass:class Circle(var radius: Double) { private val pi: Double = 3.14 fun circumference(radius: Double) = 2 * pi * radius }When first we created the
circumference()function back in Chapter 2, it made sense for it to have a parameter calledradius. But now that we’re adding this function to the class, we can just refer to the value of theradiusproperty instead.In other words, instead of referring to the
radiusparameter, like this…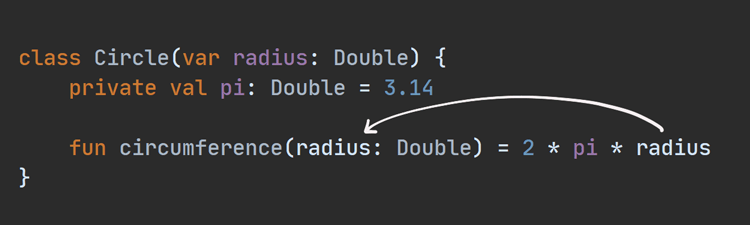
… we can remove the
radiusparameter from the function, so that it refers to the property, like this…
This introduces the concept of scope, which we will explore in depth in an upcoming chapter. For now, just be sure to remove the parameter from the
circumference()function so that2 * pi * radiuswill refer to theradiusproperty.class Circle(var radius: Double) { private val pi: Double = 3.14 fun circumference() = 2 * pi * radius }Now that
Circlehas acircumference()function, how can we call it?Calling a function on an object is done similarly to how we got the value of
radius: the name of the variable, a dot., and the name of the function.val smallCircle = Circle(5.2) val circumferenceOfSmallCircle: Double = smallCircle.circumference()And before we move on, let’s add
circumference()to our diagram!

class Circle(var radius: Double) { private val pi: Double = 3.14 fun circumference() = 2 * pi * radius }Note that the diagram does not include the body of the function. In other words,
2 * pi * radiusdoes not appear in it. That’s because class diagrams are designed to give you an idea of what data and behavior are a part of the class, without going into the specifics.Adding More Functions
When we started off this chapter, we only had a
radiusvariable and acircumference()function. Now that we’ve put those two things together into a class, it’s time to fill out ourCircleclass with other things that you might want to know about a circle.For example, we can easily add a function that calculates the area of the circle.
class Circle(var radius: Double) { private val pi: Double = 3.14 fun circumference() = 2 * pi * radius fun area() = pi * radius * radius } val smallCircle = Circle(5.2) val areaOfSmallCircle = smallCircle.area()We can also add a function to calculate its diameter.
class Circle(var radius: Double) { private val pi: Double = 3.14 fun circumference() = 2 * pi * radius fun area() = pi * radius * radius fun diameter() = 2 * radius } val smallCircle = Circle(5.2) val diameterOfSmallCircle = smallCircle.diameter()We can even change how we calculate the circumference, by using the
diameter()function instead:class Circle(var radius: Double) { private val pi: Double = 3.14 fun circumference() = diameter() * pi fun area() = pi * radius * radius fun diameter() = 2 * radius }And now, we can add these last few functions to our UML diagram.

class Circle(var radius: Double) { private val pi: Double = 3.14 fun circumference() = diameter() * pi fun area() = pi * radius * radius fun diameter() = 2 * radius }Anatomy of a Class
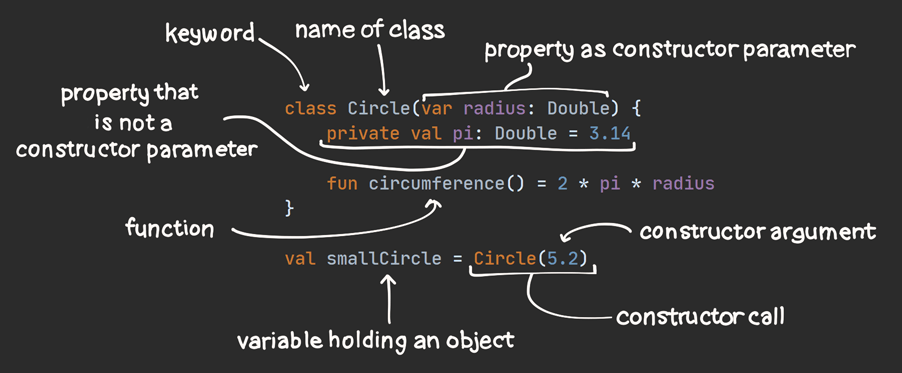
Now that we’ve covered the basics of Kotlin classes, here’s a recap of the main pieces:
Everything is an Object
Up until this chapter, we’ve only used built-in Kotlin types, such as
Double,String, andBoolean. You might be surprised to learn that when we used those types, we were actually using classes and objects! Just like we used the dot.to get properties and call functions on ourCircleobjects, we can also use a dot on any of these types.Doubles as Objects
For example, objects of type
Doublehave functions likeplus()andtimes(). So instead of writing ourcircumference()function like this…fun circumference() = 2 * pi * radius… we can instead write it like this …
fun circumference() = 2.times(pi).times(radius)Kotlin developers normally use the arithmetic operators (
+,-,*,/) in most cases, but the functions are there if you want them!Strings as Objects
Stringobjects also have some interesting properties and functions. Here are a few examples:
- The
lengthproperty tells you how many characters (i.e., letters, numbers, and symbols) are in the string.toUpperCase()will force all of the letters in the string to upper case.drop()will remove characters from the beginning of the string.Here’s how that looks in code:
val greeting: String = "Welcome" val numberOfLettersInGreeting = greeting.length // Evaluates to 7 val loudGreeting = greeting.toUpperCase() // Evaluates to "WELCOME" val substring = greeting.drop(3) // Evaluates to just "come"Booleans as Objects
Even
Booleanvariables - which are only evertrueorfalse- are objects! For example, if you want to turn on the headlights of your car if either it’s dark or it’s raining, you can write code to do that like this:val isDark: Boolean = true val isRaining: Boolean = false val shouldTurnOnHeadlights = isDark.or(isRaining) val shouldStayHome = isDark.and(isRaining)As you can see, objects are everywhere in Kotlin! Even simple values are objects.
Summary
Classes are powerful, and even though we covered a lot of ground in this chapter, we’ve really only introduced them. They open up an entire new world of ways to represent your concepts in code. Later in this book, we’ll cover more advanced concepts like abstraction and inheritance. But for now, you should be proud of your progress!
In this chapter, we finally created our very own types, using classes. We learned:
- How to define a class
- How to create an object - that is, an instance of a class.
- How to add properties to a class, and how to access them.
- How to add functions to a class, and how to call them.
- How to create a UML diagram for a single class.
- How to call functions and get properties from the built-in Kotlin types that we’ve already worked with, such as
Double,String, andBoolean.And… just in case you haven’t had enough, you also can see a wide range of examples of classes in Kotlin.
In the next chapter, we’ll look at a special kind of class, called an enum class. See you then!
Thanks to Tobenna Ezike and Esraa Ibrahim for reviewing this chapter.
Share this article: